
Stokkete / Shutterstock
When Home windows 8 made its public debut in October 2012, one of many new options it launched to customers was known as File Historical past. Nonetheless out there in each Home windows 10 and 11, it could actually allow you to be sure to by no means lose an essential file.
Merely put, File Historical past is a snapshot mechanism for all recordsdata that customers retailer within the major folders or directories related to their person accounts. Previously generally known as Libraries, these folders embody Paperwork, Music, Photos, Movies, and Desktop. Additionally included are offline recordsdata related to the person’s OneDrive account.
How File Historical past works
You’ll see some references check with File Historical past as a backup and restore software. To some extent, this description is justified. Nevertheless it’s essential to know that File Historical past backs up solely sure recordsdata. It can not, for instance, again up whole drives. Nor can File Historical past restore a whole Home windows set up. Such protection comes from whole-system backup and restore instruments; see “How one can make a Home windows 10 or 11 picture backup” for particulars.
What File Historical past does is take a snapshot of all recordsdata within the aforementioned folders and native OneDrive contents at common intervals. It gives an interface to evaluation and retrieve earlier variations of recordsdata from such snapshots. Within the sections that comply with I clarify learn how to:
- Flip File Historical past on, and the place to focus on its snapshots
- Exclude folders from the snapshot course of
- Retrieve recordsdata from a snapshot
To conclude, I’ll additionally clarify variations in protection and functionality between Home windows 10 and Home windows 11 variations of File Historical past. The excellent news right here is that File Historical past seems to be and behaves principally the identical throughout each variations. (For consistency, all display screen captures right here come from Home windows 11, however their Home windows 10 counterparts are almost equivalent, saving rounded corners on show home windows.) The dangerous information is that Home windows 10 presents extra snapshot protection than Home windows 11, as I’ll clarify on the finish of this piece.
Learn on for the essential particulars concerned in turning File Historical past on, so you may put it to work.
Turning File Historical past on and concentrating on snapshots
By default, File Historical past is turned off in each Home windows 10 and 11. It may be accessed by way of both Management Panel or the Settings app. To arrange and configure File Historical past, use Management Panel; the Settings entry level is greatest reserved for snapshot file retrieval and is roofed afterward.
Microsoft recommends, and I concur, that File Historical past works greatest when it targets an exterior storage system (corresponding to a USB drive, ideally an SSD or arduous disk of 100GB or better capability). It’s greatest to connect the goal drive earlier than turning on File Historical past for the primary time.
Observe that if BitLocker is enabled for the first Home windows drive (normally C:), you need to additionally allow BitLocker To Go on exterior drives upon which you want to seize encrypted library folders utilizing File Historical past. It’s greatest to do that earlier than enabling File Historical past as properly. In Home windows 10, right-click the goal drive in File Explorer and click on Activate BitLocker; in Home windows 11, right-click the goal drive in File Explorer and select Extra choices > Activate BitLocker. If BitLocker will not be turned on for the C: drive, you may skip this step.
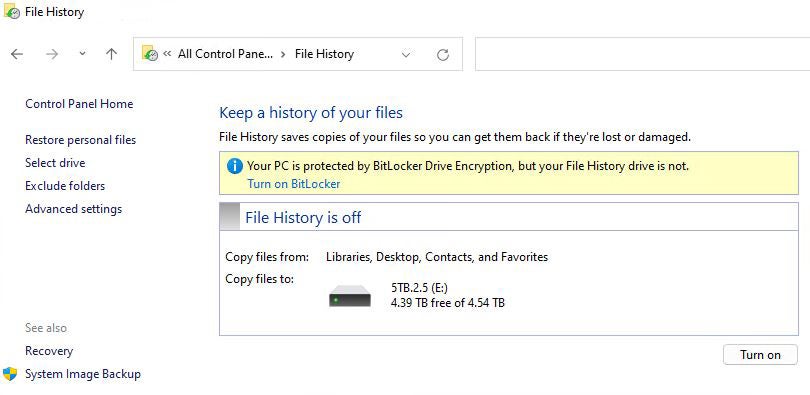
To configure File Historical past by way of Management Panel, both kind management panel into Home windows search and click on the merchandise named File Historical past, or just kind file historical past in Home windows search. A Management Panel merchandise named “Maintain a historical past of your recordsdata” seems, as proven in Determine 1.
 IDG
IDGDetermine 1: To show File Historical past on, click on the Activate button on the decrease proper.
In Determine 1, File Historical past reveals a warning for exterior drives that lack BitLocker safety, as a result of my C: drive makes use of BitLocker. Turning on BitLocker for the goal drive removes the warning in File Historical past.
The goal drive is proven within the decrease pane. On this case, it’s drive E:, a nominal 5TB exterior arduous disk.
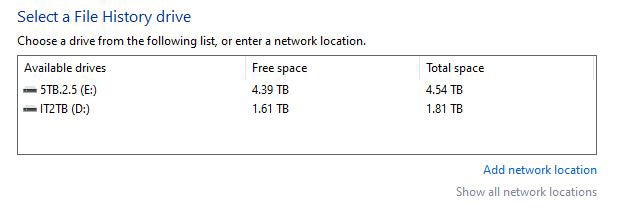
When you click on the Activate button on the decrease proper of the window, File Historical past might be turned on for the goal drive. If you wish to select a unique goal drive, you may first click on the Choose drive choice proven on the center left in Determine 1, and see a listing of eligible goal drives, as proven in Determine 2.
 IDG
IDGDetermine 2: You possibly can choose any choice that seems within the choose checklist as a File Historical past goal drive.
Choose the drive you need to use for File Historical past backups. As a result of the default choice is the most important out there drive, I’ll stick to that for my File Historical past goal.
Observe: If you want community drives to seem within the itemizing proven in Determine 2, you need to first map them to the native system. You possibly can click on Add community location on the decrease proper so as to add such a drive. If community drive mappings are already outlined, click on Present all community areas.
Again on the principle File Historical past display screen, click on Activate to allow File Historical past for the goal drive.
Taming File Historical past’s storage urge for food
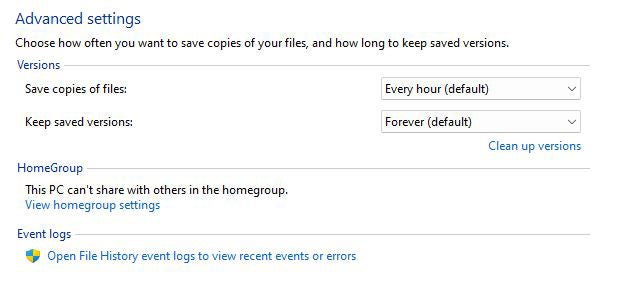
Utilizing File Historical past’s superior settings can have profound impacts on the storage that File Historical past consumes. In the principle File Historical past window (see Determine 1), click on Superior settings within the left column. Determine 3 reveals File Historical past’s backup defaults, which I routinely change once I use this built-in Home windows facility.
 IDG
IDGDetermine 3: By default, File Historical past makes a snapshot each hour and retains them without end.
Because it seems, the whole contents of the folders that fall throughout the “snapshot protection” of File Historical past on my PCs run between 13.5GB and 40GB in dimension (numerous photos and music are concerned). If a snapshot is made each hour, meaning 24 snapshots a day. In flip, meaning 324GB on the low finish, and 960GB (almost a terabyte) on the excessive finish. Day by day!
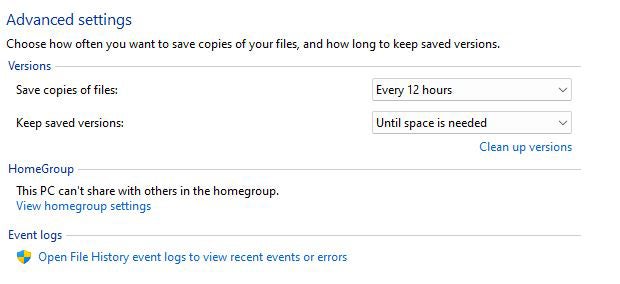
My first strikes when altering File Historical past defaults seem in Determine 4.
 IDG
IDGDetermine 4: To stop speedy disk consumption, snapshot at 12-hour intervals and restrict area consumption.
By limiting snapshot frequency and instructing File Historical past to not allow full drive consumption, you may keep away from potential future points.
That’s it for File Historical past setup. Within the subsequent part, I’ll describe learn how to exclude folders out of your snapshot contents.
Excluding folders from Snapshots
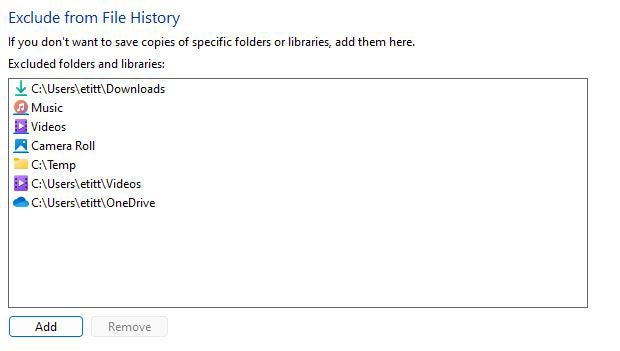
Along with ratcheting down the frequency and period of snapshots, you may restrict snapshot dimension by excluding sure folders from snapshot protection. Click on Exclude folders within the left column of the principle File Historical past window (see Determine 1) to drive this course of.
A File Explorer interface pops up the place you may choose sure folders that you simply don’t need included in every day snapshots. Determine 5 reveals the folders I usually exclude. I talk about these decisions — and their implications — in a bulleted checklist after Determine 5.
 IDG
IDGDetermine 5: I exclude folders that I again up in different methods or don’t care about snapshotting. It is best to do likewise.
Right here’s an evidence of the folders I exclude, listed by title so as of look top-down:
- Downloads: these can (and infrequently ought to be) downloaded from the supply once more anyway, to get most present variations.
- Music: I've greater than 200GB of music complete, so I don’t need it snapshotted. I maintain a backup copy of all my music on a indifferent drive, and may restore something broken or misplaced as wanted.
- Movies: identical as Music (seems twice within the screenshot due to File Explorer buildings).
- Digicam Roll: identical as Music.
- Temp: I select to not snapshot short-term recordsdata (and I’ve by no means wanted to revive any, both).
- OneDrive: I've distant copies of every thing in OneDrive within the cloud, so there’s no want to save lots of OneDrive recordsdata which can be out there to me offline.
My trimming technique cuts the scale of every snapshot from over 300GB to a way more manageable 1.5GB on my goal disk. That leaves a LOT extra room on the goal drive for saving snapshots, too.
Restoring objects from a snapshot
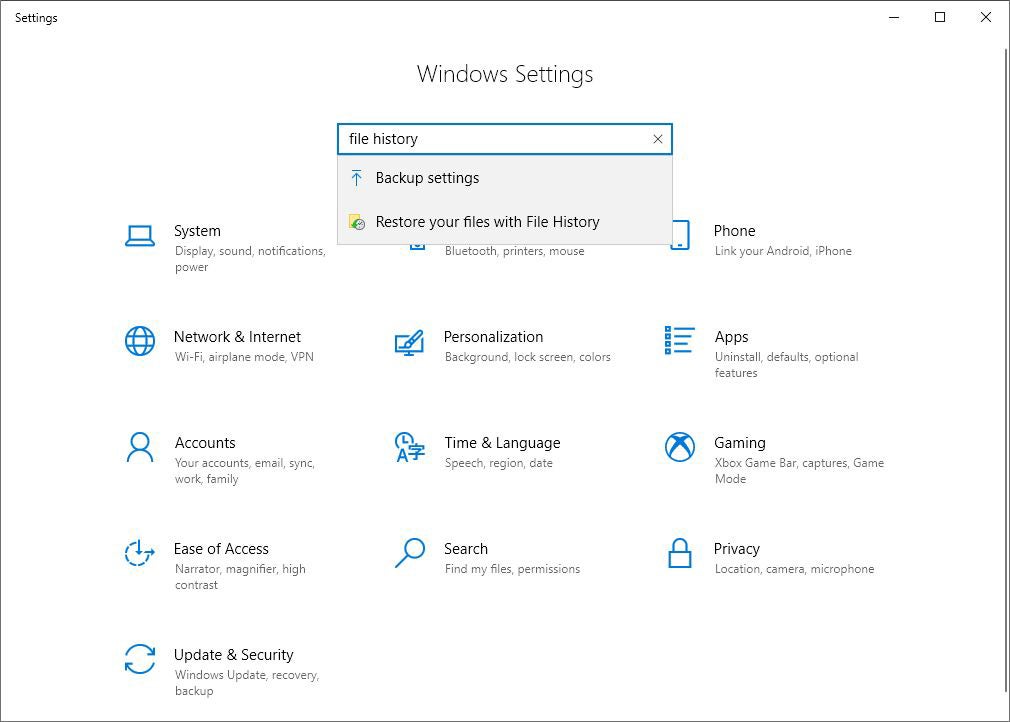
If sooner or later a file (in one of many folders that File Historical past backs up) turns into broken or goes lacking, you may restore it by way of the Settings app. Click on Begin > Settings, then kind file historical past into the Settings search field. From the choices that seem, choose Restore your recordsdata with File Historical past.
 IDG
IDGDetermine 6: Clicking “Restore your recordsdata with File Historical past” is step one to recovering your recordsdata. (Click on picture to enlarge it.)
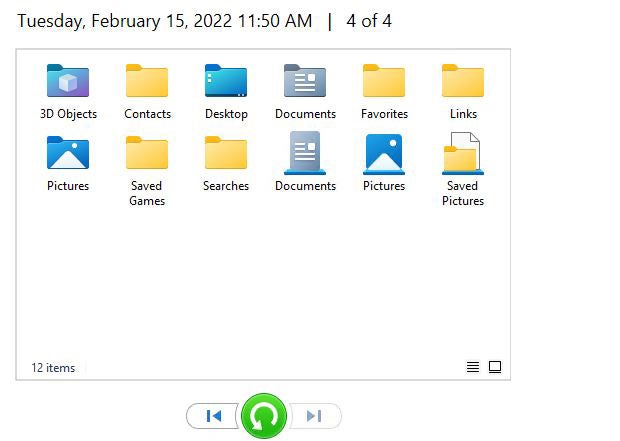
Determine 7 reveals a File Historical past snapshot from which folders or recordsdata could be retrieved, which seems when you choose the Restore your recordsdata… merchandise proven within the previous determine. This checklist of components represents a trimmed-down snapshot after I excluded the folders talked about above.
 IDG
IDGDetermine 7: Choose an merchandise and click on the inexperienced “back-circle” arrow to revive it.
The folder stage retrieval software on the backside of Determine 7 (the inexperienced “back-circle” arrow) is the important thing to restoring recordsdata and folders. If you choose any merchandise in the principle pane, then mouse over the arrow, it reads “Restore to authentic location.” Click on the inexperienced arrow, and the chosen merchandise might be restored to your PC within the state it was when the snapshot was made, changing the model of the merchandise that’s at the moment in your PC. (To focus on a number of objects for restoration, maintain the Ctrl key down whilst you click on the objects you need.)
That’s the fundamental restore approach for File Historical past. There are two extra wrinkles:
- You possibly can navigate into any of the icons proven above by double-clicking. Then you may choose a sub-item and restore on a file or sub-folder foundation.
- By default, the restore operation begins with the latest snapshot. You possibly can navigate snapshots to get to a particular date/time by clicking the left or proper arrows: left takes you again in time, proper strikes you ahead. Determine 7 reveals “4 of 4” at prime proper as a result of I selected the oldest snapshot out there to make the screenshot.
It’s actually fairly easy, so long as you’re cautious about what you choose and change.
The File Historical past distinction between Home windows 10 and 11
There's one asterisk to File Historical past’s “coated folders” limitation: In Home windows 10, you may copy different folders into the coated folders that File Historical past backs up, they usually’ll be backed up too. (TenForums.com has an glorious tutorial detailing how to take action.)
In Home windows 11, even for those who copy different folders into these containers, they gained’t be backed up. This turns a general-purpose backup software (for person folders, anyway) in Home windows 10 into one thing extra centered and particular in Home windows 11.
File Historical past: To make use of or to not use?
File Historical past is there for individuals who want to use it in Home windows 10 or 11. It may cowl the contents of your person recordsdata, and is especially useful for snapshotting the Paperwork folder.
Personally, I are inclined to retailer my work recordsdata on a pair of separate drives the place I maintain all “work in progress.” That picture backup additionally contains my D: and F: drives (the place I maintain “work in progress” and key private recordsdata). I additionally maintain music, movies and photos on separate drives (and folders). Thus, I favor making a every day picture backup to utilizing File Historical past on my manufacturing PC (nonetheless working Home windows 10, BTW).
For many who use Home windows’ default library recordsdata (Paperwork, Photos, Video, Music, and so forth) to retailer their essential stuff and work in progress, File Historical past could be a helpful and useful supply of backup snapshots. It’s as much as you to determine whether or not or not it is smart, so long as you make use of it together with a whole backup and restore software program software that may change your Home windows picture in addition to the recordsdata it makes use of. As they are saying on the web, YMMV (Your Mileage Could Fluctuate), however extra safety is all the time higher than much less!
Post a Comment